Decorating a chocolate sponge cake

I manage to snap these photos during the Cake day at TV3. The demo was conducted by a chef from KDU. If I’m not mistaken, it’s Chef Raymond. Thank you Chef.
STEP 1 : LEVELING THE CAKE

Some tips – first look at eye level at the top of the cake. Make sure the surface is level, if not, put your serrated knife at the lowest point and trim to follow this level. To layer the cake, first measure the height of the cake and then maybe mark on the sides with a toothpick to divide the cake into equal proportion. Place your other hand on top of the cake, then cut in a slow sawing motion. It’s better to use a long knife so you can see the knife end on the other side of the cake, to guide you.
STEP 2 : FILLING THE LAYER

Here the Chef is brushing the layer with a simple sugar syrup. 1/2 cup of sugar mix with 1/2 cup of water, heat until the sugar has dissolved. You could also substitute the water with liquids such as coffee, lemon juice etc, and add extract or flavoring oil. Up to you lah, to match the flavour of the cake ![]() .
.
After the layer is soaked with the syrup, scoop the buttercream into the center of the cake.

Using a spatula, spread the frosting back and forth, pushing it towards the edge of the cake.

Put the second layer back on top. By the way, its better to use the bottom of the cake as the top (turn the cake over) as usually the bottom part is much smoother.

STEP 3 : FINAL FROSTING
Place the iced cake on top of a wire rack, with a pan beneath. Same method as Steam buttercream, remember ?

Pour the ganache or chocolate sauce on top and shake, shake, shake the tray so it covers the whole cake. (No wonder their cake is soooo smooth.. ) To use this method, the sauce has to be of a soft consistency, usually while it is still warm. Add additional cream to get the consistency required.
Actually, I didn’t manage to copy the recipe for the chocolate sauce that our Chef used. I remember him mentioning cocoa powder, probably the recipe is similar to this.

STEP 4 : FINAL DECORATION
Our chef is using fresh fruits brush with apricot glaze. Piping white chocolate to make some interesting design using a parchment paper.


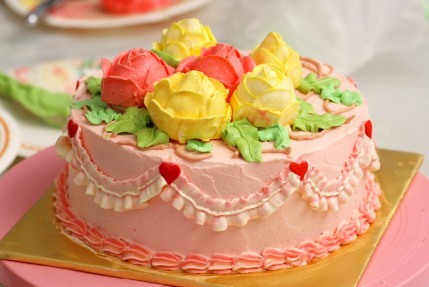
The completed cake – the white fan is made from chocolate too.

Hope this tutorial is helpful. Catch you later !


Contact me
Yasmin Sanusi
Sms/ whatsapp : 019-3805344
Email : minbakingproject@gmail.comARISSA AZMAN RESOURCES(002206222P)
Taman Cheras Indah,
56100 Kuala LumpurCLICK BELOW TO VISIT MY INSTAGRAM
Order my books

Ilham reka kek fondan
Kesabaran yang tinggi dalam menghasilkan hiasan kek yang cantik dan menarik memberikan kepuasan kepada para peminatnya. Justera, buku ini menghimpunkan beberapa ilham rekaan hiasan kek fondan untuk anda cuba. RM22.00.
Learn More...


 Yasmin bt. Sanusi. Located in Kuala Lumpur, Malaysia. Bio : Cake decorator and author of 4 sugarcraft/ cooking books. BSc (Hons) Urban Land Economics, Sheffield, UK. Certificate in Bread & Flour Confectionery, M'sian Inst. of Baking. International Cert in Cake Decorating, Taylor’s College. Professional Diploma in Sugarcraft, Knightsbridge PME. Wilton method cake decorating, ICCA.
Contact no: 019-3805344Email : minbakingproject@gmail.com Currently teaching from home. Past experiences : Volunteered with Yayasan Salam M'sia to teach baking.
Conducted demo at Universiti Sains Islam Msia, Nilai 2012, Malaysian International Food & Beverage fair 2012, PWTC KL.
KL International Book Fair, PWTC 2010 & 2012.
Featured in Aroma magazine - November 2011 issue, Groupon website - 28th April 2011 issue, Good Living magazine - July 2009 issue. TV3 25th anniversary Cake Day - April 2009.
"Apa-apa aje" TV3 programme - Oct 2008.
Advisor for Kolej Komuniti Cake deco syllabus, 2010.
Yasmin bt. Sanusi. Located in Kuala Lumpur, Malaysia. Bio : Cake decorator and author of 4 sugarcraft/ cooking books. BSc (Hons) Urban Land Economics, Sheffield, UK. Certificate in Bread & Flour Confectionery, M'sian Inst. of Baking. International Cert in Cake Decorating, Taylor’s College. Professional Diploma in Sugarcraft, Knightsbridge PME. Wilton method cake decorating, ICCA.
Contact no: 019-3805344Email : minbakingproject@gmail.com Currently teaching from home. Past experiences : Volunteered with Yayasan Salam M'sia to teach baking.
Conducted demo at Universiti Sains Islam Msia, Nilai 2012, Malaysian International Food & Beverage fair 2012, PWTC KL.
KL International Book Fair, PWTC 2010 & 2012.
Featured in Aroma magazine - November 2011 issue, Groupon website - 28th April 2011 issue, Good Living magazine - July 2009 issue. TV3 25th anniversary Cake Day - April 2009.
"Apa-apa aje" TV3 programme - Oct 2008.
Advisor for Kolej Komuniti Cake deco syllabus, 2010.

 Enter your e-mail to get Bakingproject's updates delivered to your inbox.
Utk buttercream, boleh guna pewarna liquid yg dlm botol kaca tu aje. Utk fondant and gumpaste, elok pakai pewarna gel or concentrated paste. Rasanye oil base tu utk airbrush. thanks Nora.
salam kak min, nora nak tanya satu soalan je..
pewarna apakah yang sesuai (pewarna biasa @ oil base) digunakan untuk membuat butter cream dan gumpaste.
Salam Jun, kalau choc ganache,setahu akak just add a little butter to it utk kilatkan dia. Cuba cari resepi ganache. Amt of cream yg kita add ke chocolate tu terpulang pada kita, kalau nak senang letak, cairkan sikit. Kalau nak pipe, then kurangkan cream, biar dia pekat sikit. Masuk dlm fridge sekejap utk jadikan lagi keras. Tq.
slm,
Blh Jun panggil Kak Min la ye….
jun nk tanya la…camne nk buat choc. topping berkilat n senang nk letak atas ke….
Jazakallah 4 this!
Kak Ina, sama-sama.
Bel, lupa nak mention, just guna spatula je utk angkat, ataupun ambik lapik baking tin tart yang boleh tanggal tu. Lapik kat bawah and angkat.
kak min, how do we transfer the cake from rack to pan without damaging the bottom part?
min, thx for the detail explainations.