» Category Archives: Gum paste projects
Sugar flowers at 20% discount !
If you are looking for a place to shop for gumpaste and royal icing flowers, look no further.. Cake Connection in Petaling Jaya offers so many types of flowers. You will surely find one that will suit your cake. Just look at the beautiful and unique flowers here. And they are also Halal, you …
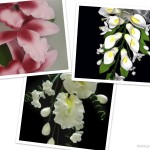
Gum paste flower – Calla Lily
It seems some couples do chose to get engaged or marry during this Raya month. Probably to coincide with the long public and school holidays. The cake above was a last minute order, Calla Lily was the quickest flower I could come out with, given the short notice period. The weather was also excellent, hot …
Gumpaste flower – Evening Primrose
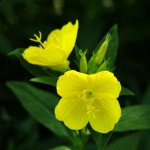
(image from http://troyandmartha.blogspot.com/2008/03/wild-flowers-from-coast-and-se-texas.html) I notice I haven’t posted any article under the category ‘gumpaste project’ for quite a while. Today I was flipping through my favourite book – “Alan Dunn’s best of Floral Sugarcraft”. There is a project on making a “Fragrant Evening Primrose”. The steps look simple and no special cutter is needed, just …
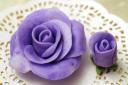
Gumpaste roses
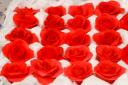
Nothing much has been happening this past few days. Just resting at home, trying to catch up on sleep and tv. Got a message from a friend requesting for gumpaste roses urgently. So I sat down in my kitchen and made these roses, while watching endless Malay, Indon and Spanish soap operas. (wish I have …
Gumpaste flower – Gerbera
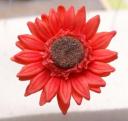
From p_jp55′s photostream at Flickr I’m not good at remembering flower names. I like gardening but to identify the flowers, let alone to remember the scientific name is like going through the agony of taking my Biology exam all over again. This flower I’m making, it’s called Gerbera (that’s what the PME magazine says). It …
Making roses without cutters
Hi everyone.. sorry for not updating this blog more often. Please subscribe to my RSS feed if you haven’t done so. Anyway, today I was fasting (ada gak rasa macam nak pengsan, baru 1st day ganti ! ) so I was quite tired and free of cooking. Took out my gumpaste and started making these …
Flower paste / gum paste recipe
This is another version of a gumpaste recipe. It uses gum tragacanth. You can also try making gumpaste using gum tex from Wilton. I’ve tried the recipe below and it works. So, as long as I can get hold of gum trag I will be using this recipe for all my flowers. Ingredients 500 g …
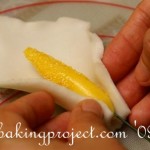
Pulled flowers
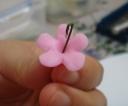
Pulled or finger flowers are flowers which are made without using any cutters or special equipment. They are easy to do and just needs some molding with your fingers. These are the steps to make a basic blossom. First, make a round pea-sized shape out of the gumpaste or fondant. Use the end of your …
Frangipani flower and cake
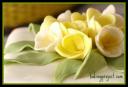
I was leafing through my cake decorating book and saw this beautiful frangipani flowers (kemboja). Tried doing it last night, the gumpaste flowers were left to dry in egg cartons on top of my fridge. Somehow, I find this method always speed up the drying of the flowers. By today, the frangipanis are quite hard. …
Gum paste flowers – roses
I have tried making roses many times but up till to date, I’m still not satisfied with how it turned out. However, I think I’ll just leave a note here on how it is done. Then we can all practice to perfect our roses. Items needed are : 6 inch stiff wire, tiny hook …
Contact me
Yasmin Sanusi
Sms/ whatsapp : 019-3805344
Email : minbakingproject@gmail.comARISSA AZMAN RESOURCES(002206222P)
Taman Cheras Indah,
56100 Kuala LumpurCLICK BELOW TO VISIT MY INSTAGRAM
This error message is only visible to WordPress adminsThere has been a problem with your Instagram Feed.Order my books

Ilham reka kek fondan
Kesabaran yang tinggi dalam menghasilkan hiasan kek yang cantik dan menarik memberikan kepuasan kepada para peminatnya. Justera, buku ini menghimpunkan beberapa ilham rekaan hiasan kek fondan untuk anda cuba. RM22.00.
Learn More...


 Yasmin bt. Sanusi. Located in Kuala Lumpur, Malaysia. Bio : Cake decorator and author of 4 sugarcraft/ cooking books. BSc (Hons) Urban Land Economics, Sheffield, UK. Certificate in Bread & Flour Confectionery, M'sian Inst. of Baking. International Cert in Cake Decorating, Taylor’s College. Professional Diploma in Sugarcraft, Knightsbridge PME. Wilton method cake decorating, ICCA.
Contact no: 019-3805344Email : minbakingproject@gmail.com Currently teaching from home. Past experiences : Volunteered with Yayasan Salam M'sia to teach baking.
Conducted demo at Universiti Sains Islam Msia, Nilai 2012, Malaysian International Food & Beverage fair 2012, PWTC KL.
KL International Book Fair, PWTC 2010 & 2012.
Featured in Aroma magazine - November 2011 issue, Groupon website - 28th April 2011 issue, Good Living magazine - July 2009 issue. TV3 25th anniversary Cake Day - April 2009.
"Apa-apa aje" TV3 programme - Oct 2008.
Advisor for Kolej Komuniti Cake deco syllabus, 2010.
Yasmin bt. Sanusi. Located in Kuala Lumpur, Malaysia. Bio : Cake decorator and author of 4 sugarcraft/ cooking books. BSc (Hons) Urban Land Economics, Sheffield, UK. Certificate in Bread & Flour Confectionery, M'sian Inst. of Baking. International Cert in Cake Decorating, Taylor’s College. Professional Diploma in Sugarcraft, Knightsbridge PME. Wilton method cake decorating, ICCA.
Contact no: 019-3805344Email : minbakingproject@gmail.com Currently teaching from home. Past experiences : Volunteered with Yayasan Salam M'sia to teach baking.
Conducted demo at Universiti Sains Islam Msia, Nilai 2012, Malaysian International Food & Beverage fair 2012, PWTC KL.
KL International Book Fair, PWTC 2010 & 2012.
Featured in Aroma magazine - November 2011 issue, Groupon website - 28th April 2011 issue, Good Living magazine - July 2009 issue. TV3 25th anniversary Cake Day - April 2009.
"Apa-apa aje" TV3 programme - Oct 2008.
Advisor for Kolej Komuniti Cake deco syllabus, 2010.

 Enter your e-mail to get Bakingproject's updates delivered to your inbox.