» Category Archives: Cake decorating techniques
PME Professional Diploma course – Sugarpaste Module
Today is the first day of the course. In UK, the course is run once a week, total of 5 weeks. So basically it’s a 5 days course. Here it is split into 3 weeks. I’m so tired but at the same time, excited to see what’s in store for tomorrow. Let me show you …
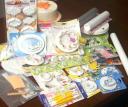
ICES Day of Sharing

Beads made from isomalt Today has been a wonderful day for me. I’m still tired, but excited to download all the pictures from the above event. ICES stands for International Cake Exploration Societe, and the Malaysian rep is our Miss Rosalind Chan (of ICCA, PJ). Here’s the brief description about ICES Day of Sharing : …
Cupcakes in a jiffy
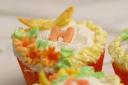
My brother called yesterday and announce that he’s taking us for lunch to celebrate my dad’s belated birthday. I had always wanted to make a nice birthday cake for my dad, but was waiting for him to come to KL from our hometown in Perak. My dad had just arrived in KL yesterday. Due to …
Decorating with clown head
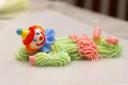
I noticed some leftover butter cream in the fridge.. I thought of throwing it away, but then decided to use it to practice on my clowns. You need to buy the clown heads which are quite cheap, about RM2.50 a packet. (Maybe 10 heads, I didn’t count). These are made of plastic. The tip I’m …
Decorating with piping gel

Piping gel is another ingredient that you can use to make interesting pictures on cakes. Most of my visitors who are in the cake business is already an expert in this technique. However, for the sake of some newbies, I’ve decided to document my project this morning using piping gel.Take note that I am also …
Making leaf & cake decorating from buttercream

Yesterday I have shown you the steps in making roses from buttercream. Today, to complete the picture, I’m going to make the leaf and show more ideas on basic piping. The tip used for the leaf is this one. The tip comes in a few sizes, the bigger the tip, the bigger the leaf will …
Making a rose from butter cream
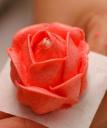
I’ll be showing you the step by step way to make roses from butter cream. Once you know the basics, maybe your roses will turn out prettier than mine. We learn together-gether, ok.. The equipments that you need is a rose petal tip, piping bag, icing nail, rose cone, square paper and of course, the …
Contact me
Yasmin Sanusi
Sms/ whatsapp : 019-3805344
Email : minbakingproject@gmail.comARISSA AZMAN RESOURCES(002206222P)
Taman Cheras Indah,
56100 Kuala LumpurCLICK BELOW TO VISIT MY INSTAGRAM
This error message is only visible to WordPress adminsThere has been a problem with your Instagram Feed.Order my books

Ilham reka kek fondan
Kesabaran yang tinggi dalam menghasilkan hiasan kek yang cantik dan menarik memberikan kepuasan kepada para peminatnya. Justera, buku ini menghimpunkan beberapa ilham rekaan hiasan kek fondan untuk anda cuba. RM22.00.
Learn More...


 Yasmin bt. Sanusi. Located in Kuala Lumpur, Malaysia. Bio : Cake decorator and author of 4 sugarcraft/ cooking books. BSc (Hons) Urban Land Economics, Sheffield, UK. Certificate in Bread & Flour Confectionery, M'sian Inst. of Baking. International Cert in Cake Decorating, Taylor’s College. Professional Diploma in Sugarcraft, Knightsbridge PME. Wilton method cake decorating, ICCA.
Contact no: 019-3805344Email : minbakingproject@gmail.com Currently teaching from home. Past experiences : Volunteered with Yayasan Salam M'sia to teach baking.
Conducted demo at Universiti Sains Islam Msia, Nilai 2012, Malaysian International Food & Beverage fair 2012, PWTC KL.
KL International Book Fair, PWTC 2010 & 2012.
Featured in Aroma magazine - November 2011 issue, Groupon website - 28th April 2011 issue, Good Living magazine - July 2009 issue. TV3 25th anniversary Cake Day - April 2009.
"Apa-apa aje" TV3 programme - Oct 2008.
Advisor for Kolej Komuniti Cake deco syllabus, 2010.
Yasmin bt. Sanusi. Located in Kuala Lumpur, Malaysia. Bio : Cake decorator and author of 4 sugarcraft/ cooking books. BSc (Hons) Urban Land Economics, Sheffield, UK. Certificate in Bread & Flour Confectionery, M'sian Inst. of Baking. International Cert in Cake Decorating, Taylor’s College. Professional Diploma in Sugarcraft, Knightsbridge PME. Wilton method cake decorating, ICCA.
Contact no: 019-3805344Email : minbakingproject@gmail.com Currently teaching from home. Past experiences : Volunteered with Yayasan Salam M'sia to teach baking.
Conducted demo at Universiti Sains Islam Msia, Nilai 2012, Malaysian International Food & Beverage fair 2012, PWTC KL.
KL International Book Fair, PWTC 2010 & 2012.
Featured in Aroma magazine - November 2011 issue, Groupon website - 28th April 2011 issue, Good Living magazine - July 2009 issue. TV3 25th anniversary Cake Day - April 2009.
"Apa-apa aje" TV3 programme - Oct 2008.
Advisor for Kolej Komuniti Cake deco syllabus, 2010.

 Enter your e-mail to get Bakingproject's updates delivered to your inbox.