» Category Archives: Cake decorating techniques
Royal icing consistencies
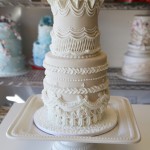
My favourite medium to do cake deco is of course, fondant or sugarpaste. Buttercream and royal icing are totally different compared to fondant, you will have to do lots of piping work and it can sometimes be a bit messy. But in terms of taste, buttercream is the best of all three ( …
April giveaway – 24pcs nozzle
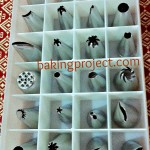
Thank you everyone for your wonderful comments and participation.. unfortunately I only have 1 set to giveaway this time.. the lucky winner is Commentator No. 10. Congaratulations to Nur Liyana Sulaiman.. please email me at minbakingproject@gmail.com to claim your gift. Thank you all. —————————————————————— Wow, time flies and its already April 2013. How was the school …
Making Oso Number One cake
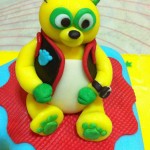
When I received an order for this cake, I had to google who is this Special Agent Oso.. well, my kid is 14 and I no longer watch Disney channel. The cake was for a 1 year old boy. I used the no. 1 pan, instead of joining several cakes. Managed to snap a few …
Making a cigarette cake
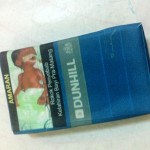
Thank you to Cik Dina for ordering this cake. I have posted the pic in my FB page yesterday and would also like to say thank you for all the ‘likes’ and comments. The making of the cake was not difficult actually. The cigarette box.. well, you guessed it. It was fondant wrapped in edible …
Lace mold and embossers
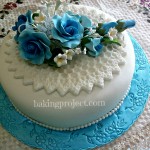
This is the cake that I made for Cik Ayu for her wedding 2 days ago.. it was a last minute request. Talking about last minute request, there was one time when a customer called me on the morning of her wedding day, asking if I have a spare cake. I guest sometimes we do …
Making a ‘Swiss roll’
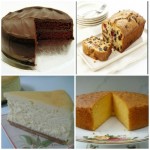
Today we had our ‘Baking for Beginner’ class, taught by Chef Gunawan. 5 types of cakes were taught in this class – how to bake butter cake, chocolate cake, fruit cake, cheese cake and also sponge cake. Full class info is at the top page. Chef Gunawan was kind enough to show us how to …
Cake decorating with Edible image
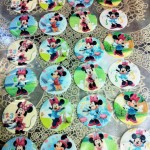
NOTE : I DO NOT SELL EDIBLE IMAGE, thank you. Even though applying edible image to cakes and cupcakes is common these days and taken for granted, you might be surprised that not everybody knows about Edible Image. A few of my students who are new in cake decorating are unsure on how to …
Making a teddy bear cake topper
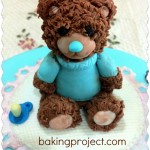
Sometimes when I am not too busy, I do accept cake orders. This time the request was for a Baby Shower cake. It’s a boy, so the theme was light blue. Even the bear’s nose is blue, notice ? Heheh.. ok here goes. A tutorial on how to make a teddy bear. I am using …
Decorating a Number One Cake
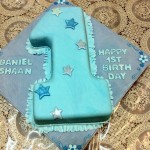
Today I decorated a Number 1 Fondant cake and I thought I’d share the step by step pictures with you. First things first, is baking a Number cake.. nowadays, it should be a simple process. You can get Number cake pans sold in baking supply shop. However, in my case, I have to bake a …
Figurine from Rice Krispies Treats
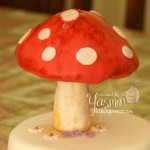
Just a short note on how I completed my giant mushroom using Rice Krispies Treats (RKT). Read yesterday’s post on how I made the RKT. Once the RKT is cooled, I layered it with buttercream to close the little holes and make the surface smooth. Then, just cover it with fondant. If you want the …
Contact me
Yasmin Sanusi
Sms/ whatsapp : 019-3805344
Email : minbakingproject@gmail.comARISSA AZMAN RESOURCES(002206222P)
Taman Cheras Indah,
56100 Kuala LumpurCLICK BELOW TO VISIT MY INSTAGRAM
Order my books

Ilham reka kek fondan
Kesabaran yang tinggi dalam menghasilkan hiasan kek yang cantik dan menarik memberikan kepuasan kepada para peminatnya. Justera, buku ini menghimpunkan beberapa ilham rekaan hiasan kek fondan untuk anda cuba. RM22.00.
Learn More...


 Yasmin bt. Sanusi. Located in Kuala Lumpur, Malaysia. Bio : Cake decorator and author of 4 sugarcraft/ cooking books. BSc (Hons) Urban Land Economics, Sheffield, UK. Certificate in Bread & Flour Confectionery, M'sian Inst. of Baking. International Cert in Cake Decorating, Taylor’s College. Professional Diploma in Sugarcraft, Knightsbridge PME. Wilton method cake decorating, ICCA.
Contact no: 019-3805344Email : minbakingproject@gmail.com Currently teaching from home. Past experiences : Volunteered with Yayasan Salam M'sia to teach baking.
Conducted demo at Universiti Sains Islam Msia, Nilai 2012, Malaysian International Food & Beverage fair 2012, PWTC KL.
KL International Book Fair, PWTC 2010 & 2012.
Featured in Aroma magazine - November 2011 issue, Groupon website - 28th April 2011 issue, Good Living magazine - July 2009 issue. TV3 25th anniversary Cake Day - April 2009.
"Apa-apa aje" TV3 programme - Oct 2008.
Advisor for Kolej Komuniti Cake deco syllabus, 2010.
Yasmin bt. Sanusi. Located in Kuala Lumpur, Malaysia. Bio : Cake decorator and author of 4 sugarcraft/ cooking books. BSc (Hons) Urban Land Economics, Sheffield, UK. Certificate in Bread & Flour Confectionery, M'sian Inst. of Baking. International Cert in Cake Decorating, Taylor’s College. Professional Diploma in Sugarcraft, Knightsbridge PME. Wilton method cake decorating, ICCA.
Contact no: 019-3805344Email : minbakingproject@gmail.com Currently teaching from home. Past experiences : Volunteered with Yayasan Salam M'sia to teach baking.
Conducted demo at Universiti Sains Islam Msia, Nilai 2012, Malaysian International Food & Beverage fair 2012, PWTC KL.
KL International Book Fair, PWTC 2010 & 2012.
Featured in Aroma magazine - November 2011 issue, Groupon website - 28th April 2011 issue, Good Living magazine - July 2009 issue. TV3 25th anniversary Cake Day - April 2009.
"Apa-apa aje" TV3 programme - Oct 2008.
Advisor for Kolej Komuniti Cake deco syllabus, 2010.

 Enter your e-mail to get Bakingproject's updates delivered to your inbox.